Photoshop action to add copyright
September 13, 2003 | Comments (0)
On the fuji talk forum on dpreview there was a discussion about how to automate a copyright notice on a batch of images. I think this should be quite easy in photoshop if you follow the next steps:

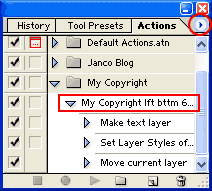
action panel
- Download My-Copyright.atn action (13kb) and save it locally. The default for Photoshop actions is the “Photoshop 7.0\Presets\Photoshop Actions” folder.
- Goto menu Window | Actions to bring the actions panel visible
- Click on the top-right dropdown menu (red circle) and select Load actions… from the menu; select the My-Copyright.atn file from step 1. This brings a new action set into the actions panel called “My Copyright lft bttm 600x450”.
- Load an image, resize it to 600x450 and click the action. You will see it shows a copyright notice with a slight white glow around it. The visibility of the glow is completely dependent on the image background.
- I guess you would not want to have my name on your images so exapnd the action in the actions panel and double-click on the “Make text layer” line. This ‘activates’ the command and you’re free to change the text on an actual image. Next time you run the action it takes your own text.
Here is an example: ![]()
“Don’t ever do this on your original images!”
As actions can be run on a batch of images, it should be quite easy to mark all your images with this copyright. Start File | Automate | Batch… and select the images or directory and select the My Copyright action. I would never use this on any of my original images so always be sure you run it to a different destination directory.
Have fun…
Comments
Hello,
Thanks for this nice script, but how to use it with pictures witch are not 600*450 ???
Thanks for your answer
Regards
Fabrice
Well, in that case you could manually move the layer to the place you want to have the text! I don't know about a way to make this dynamic. I have seen that with other sizes the text normally comes somewhere around the left right corner. I guess that with the new java-scripting engine you could make more sophisticated scripts.
Its the second time I visited your web site. Looks interesting. However, Id recommend you thought of a new design.
However, Id recommend you thought of a new design.
Content is the key! :)
Looking for anaction that would do this: When I take pictures they go on a folder with the name 203CANON
what I want the action to do is to put the name of the folder end the picture's name IMG_0307.jpg on each particular picture( like the copyright symbol) .. so in the picture it would appear the name of the folder and the name of that picture.
thanks
Hello, I liked you site very much. But maybe you should change the color of the background on the site?
I used your script with some minor tweaks in placing and text and effects and such, but i can't run it effectively in batch-mode (File | Automate | Batch). It runs through the script in the first image, and then it halts at the dialogue asking me which quality i would like on my JPEG image. What gives? When i record the actions i want, including "merge layers" and "save"), i get no such dialogue! It´s a helpful script anyhow!
If you answer this, please notify me via mail.
Thanks in advance!
to dynamically align a layer to a certain point:
(easy, hehe)
first use actions or whatever means to get your text or logo ANYWHERE on the canvas, just get the layer there!
RECORD THIS
1. Cntrl-A to select the entire canvas
2. Free Transform selection to scale-down enough border around the edge of your image.
3. Select the new layer (or layer set) with your text (or logo).
4. Activate the move tool (V).
5. Use the control buttons in the upper toolbar to align the new layer and selection bottom edges-- and again to align right edges. (now it's spaced perfectly in the corner)
6. Deselect
7. Done!
Additional steps may be added for special touches.
Now the only problem that i'm trying to figure out WITHOUT the use of JavaScript is how to take any two images and resize the top layer set dynamically to fit ANY canvas size to scale. If anyone has an action for this PLEASE let me know.